The previous article, we created a dynamic DNS name and a machine on vultr.com, which will be our wireguard VPN host. This is the machine all the clients will connect to and can if we should desire run NginX as a reverse proxy that opens up those clients to the public world through that proxy. (we don't need the NginX reverse proxy if we don't want to expose the machines to the public. This will keep things completely private, but I wanted to mention it as another route if we need it.)
Installing ddclient on Ubuntu.
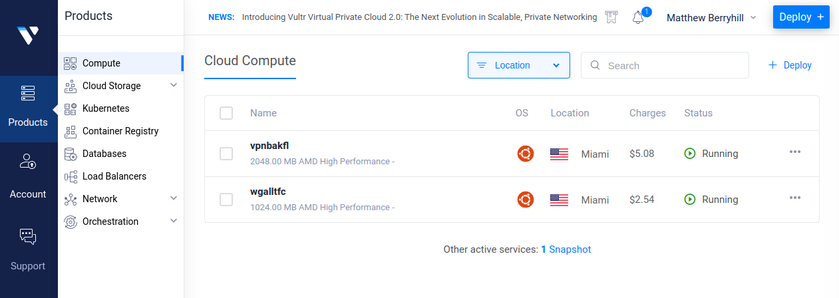
The first application we need is ddclient. This is what updates namescheap with our ip address. It is available in ubuntu's repository so we can simply run the "apt" commands. Before we can do that we need to get access to the terminal on our server. We have a few options, but I like to use something like "putty" to ssh into our server's ip address. You can find the server's ip address and the password from my.vultr.com, and click on the machine you want to view. There is a place that you can reveal the password for the root account. Assuming you did that let's run the commands to install and configure ddclient...
apt install ddclient
Now we can run the next command to edit the config file...
nano /etc/ddclient.conf
In the ddclient.conf file we need it to look like the following:
# Configuration file for ddclient generated by debconf
#
# /etc/ddclient.conf
protocol=namecheap \
use=if, if=enp1s0 \
login=xyz123.net \
password='1asdfasdfsa2ef1234daf345dsg768' \
wireguard, test1
###########################################
NOTE: I left "test1" in there to show you what you can do if you wanted more sub domains... you can keep appending more on as you wish. For now remove that "test1" as it probably doesn't exist and could cause some issues trying to update a subdomain that doesn't exist. The worst case is you could get error logs. It's also important to point out the "use=if" tells the software you want to use the network interface to get the ip address, and "if=enp1s0" specifies which interface you are getting the ip address of. In this VM we only have one, so this is where users will try to connect through.
Installing Wireguard VPN on Ubuntu
I really don't want to go through all of the steps and details to setting this up on the server. Especially since there exists other sites that go through it already. If you want to get a better understanding of how to do this, please check out how-to-set-up-wireguard-on-ubuntu-20-04
In this article I'm going to keep it very simple and just show the main steps...
The first one is to install the software...
apt install wireguard resolvconf
The DNS resolver isn't necessary for what we are doing, but it is needed if we want to route all of our traffic through the VPN, so we'll use it anyways.
resolvectl dns enp1s0
We need to generate the server's private and public keys. The private key doesn't leave the server. The public key is ok to send to anyone in the world. Being public key cryptography, it doesn't matter who has the public part. It is more complicated than I need to get into, but what the software does is encrypt some data with the public key, but only the private key can undo that encryption. This means it's important to keep your private key safe!
To make the keys, as the article linked to above says... you can run:
wg genkey | tee /etc/wireguard/private.key
chmod go= /etc/wireguard/private.key
cat /etc/wireguard/private.key | wg pubkey | tee /etc/wireguard/public.key
Now edit the /etc/wireguard/wg0.conf file (or create it if doesn't exist)
nano /etc/wireguard/wg0.conf
make it look like the following, but fill in the values you need:
################################################
[Interface]
Address = 192.168.51.1/24
DNS = 1.1.1.1
DNS = 8.8.8.8
SaveConfig = true
PostUp = ufw route allow in on wg0 out on enp1s0
PostUp = ufw route allow in on wg0 out on wg0
PostUp = iptables -t nat -I POSTROUTING -o enp1s0 -j MASQUERADE
PreDown = ufw route delete allow in on wg0 out on enp1s0
PreDown = ufw route delete allow in on wg0 out on wg0
PreDown = iptables -t nat -D POSTROUTING -o enp1s0 -j MASQUERADE
ListenPort = 51825
PrivateKey =
################################################
A few things to note:
the commands that say "PostUp" and "PreDown" are issued when the wireguard application starts up and shutsdown. Specifically we use it to set firewall rules to have while the VPN is connected and when it ends. The "UFW route allow on wg0 out on enp1s0" tells the UFW firewall to allow the data from the wg0 interface (our VPN) to go our the network card. If you want your machines to be able to go out to the internet we need that. If you want your machines to talk to each other you need the line with "ufw route allow in on wg0 out on wg0" this allows machines on the wg0 to cross over to other machines on the wg0 interface.
The "Address" is the IP address we want this machine to have on the VPN. I made sure to keep it with a .1 at the end. This is what routers will use. For example if you buy a home router it defaults to 192.168.1.1.
The listen port I have in bold because you can change that too. I changed the default to make it slightly less obvious. You can set this port to 8080 or whatever you want. Just make sure it's not a port of any services you may want to publicly expose if you are going to run a reverse proxy like NginX.
Now that we have that out of the way we need to make sure to configure it to start at boot.
sudo systemctl enable [email protected]
sudo systemctl start [email protected]
sudo systemctl status [email protected]
sudo wg-quick up wg0
We need to also open our firewall's ports with:
sudo ufw allow 51825/udp
sudo ufw allow OpenSSH
At this point we have a running wireguard VPN server we can connect to, but there are no clients allowed. Kind of useless, so let's get a client on...
Setting up a wiregaurd client.
This part depends a lot on the operating system and software we are using. If you are using linux the install process and creating the keys is the same as you did on the server. If you are using windows there is an app that can create the public and private keys for you. The important thing is that you have the right config file settings in the wg0.conf on the client. For the clients the "peer" it talks to is the server. Here is my example:
############################################
[Interface]
PrivateKey =
Address = 192.168.51.10/32
[Peer]
PublicKey =
Endpoint = wireguard.xyz123.net:51825
AllowedIPs = 192.168.51.0/24
PersistentKeepalive=25
############################################
For the "Address" in the "[interface]" section you would use the address the server is set to allow you to use. This is where wireguard isn't a very good at privacy, but we aren't using it for that. These IP addresses are set and the server also needs to allow that public key to use that ip address. I am using "192.168.51.x/32" because it is very unusual. I doubt a person will ever run another VPN or service in that range. instead of .51 you can choose 24,25,26 or 27...whatever you want as long as it is between 1 and 254. The reason for this is if you chose 192.168.1.1 that is the default address of your home router, so your local router will see that and thing the packets are for it. In other words they won't make it to the right place.
The "Persistent Keep Alive" in the peer section is what is supposed to keep the connection active. If your client is a server that others should connect to I highly recommend having this in there to keep the connection going. If your client is simply a device using other services I'd remove the line completely. Don't need to send our unecessary data to keep a connection. It will be active when you try using it.
For the "[Peer]" section we need to specify the server's information. In the "Allowed IPs" field we specify the ip addresses that go over to the peer. In other words, if we specified 0.0.0.0 we would say all traffic goes over the VPN. This is good if you want to use it to hide your web traffic out to the cloud provider. In this case, I specify all traffic to the IP network goes over the VPN. This means that if I visit a site like 192.168.51.1 it will send it through the VPN same as if I visit 192.168.51.22 would also be sent out to the VPN. (they don't have to really exist the machine will still send it through there) and your traffic to places like 192.168.1.1 will not be routed over the vpn. This let's you use local machines not on the VPN at the same time as you access the VPN machines. If this doesn't make sense that's ok... just keep the ips I have in the example and you'll be fine. IP addresses are a bit complicated and best left to "network engineers"
Now we have the client's config set up we can't really start it yet since it won't work...
Adding the client to the VPN Server
Let's hop back to the VPN server's terminal and run the following command to add the client to the VPN:
wg set wg0 peer allowed-ips 192.168.51.10/32
Each client will need their own IP Address, so make sure they aren't all using 192.168.51.10. As soon as the above line is executed on the server, we can tell the client to connect.
If all is good the client and server should be able to talk. To test this ping the other's VPN ip address. One the server you should be able to run
ping 192.168.51.10
and the client should be able to run
ping 192.168.51.1
If this doesn't work then your problem has to do with network traffic. That means the server might not be allowing traffic through the VPN or the IP addresses weren't configured properly... and good luck figuring it out. You will have to double check all of your settings and maybe doing some web searching. There are too many possiblilities to have in this article.
Now we have a client and a server we can keep adding new clients to the mix and they can all talk to eachother. I have noticed sometimes clients will disconnect randomly. I think this is due to unstable issues at the client's ISP.
Configuring a VPN watchdog
A simple way to keep the vpn alive is to add a watchdog script to all of your servers. Each server will be a little different, but I do have some examples for TrueNAS and UnRAID. The differences is the paths to use for the wq-quick command. In TrueNAS you have to point to the executable, but Unraid it has it in the path, so you don't have to worry about it...
To have these watchdog scripts execute, you will need to setup crontab on a linux machine. On windows or android these scripts probably won't work and the clients may already do this. For my NAS boxes that run linux I use cron jobs... can find more information about cron jobs at https://www.freecodecamp.org/news/cron-jobs-in-linux/
Here is my TrueNAS script:
###############################################
#!/bin/bash
if ! ping -c1 192.168.51.1 > /dev/null 2>&1
then
echo “Wireguard VPN is down… trying to restart”
/usr/local/etc/rc.d/wireguard stop
/usr/local/etc/rc.d/wireguard start
ping -c1 192.168.51.1 > /dev/null 2>&1
fi
###############################################
Here is my Unraid/Linux Script:
##############################################
#!/bin/bash
if ! ping -c1 192.168.51.1 > /dev/null 2>&1
then
echo “Wireguard VPN is down… trying to restart”
wg-quick down wg0
wg-quick up wg0
ping -c1 192.168.51.1 > /dev/null 2>&1
fi
##############################################
What I need to point out is we are pinging the wireguard VPN server's IP address on the VPN. If this ping works we know we are connected to the vpn otherwise it will fail, which is when we need to try the commands to restart the wg0 interface. You can run this using a cron job as mentioned above. You can set it to run */1 minutes (every 1 minute) or */5 minutes (for every 5 minutes) just a little tidbit...
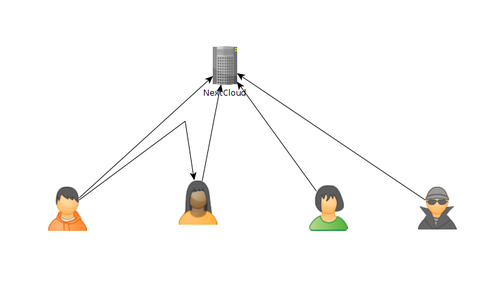
Now you should have a bunch of machines on the VPN and they all can talk to each other securely. In future articles I'll talk more about setting up reverse proxies. Reverse proxies would allow the public to access resources in the VPN. We would run the reverse proxy on the wireguard VPN host then it would direct traffic to specific IP addresses within the VPN. This is helpful if you want to run nextcloud on say Unraid and expose it to the public. If you don't want to publicly expose anything then don't worry about a reverse proxy.
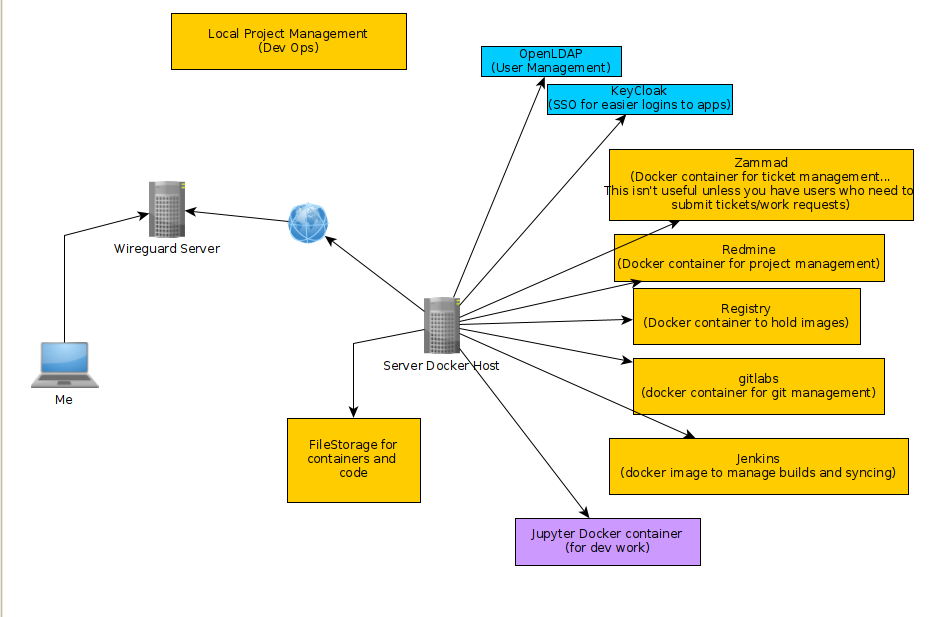
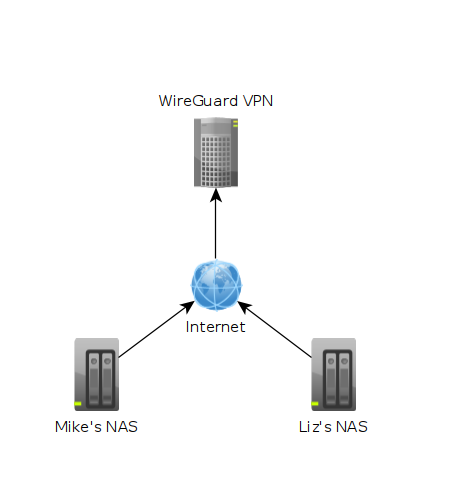 In the image above each machine is at a different location. One might be in Texas while another could be in Washington. The "Wireguard VPN" is the only one that we can directly talk to on the internet. In other words, it's the only one exposed publically. This machine is running on a cloud provider such as vultr.com or you can run it on amazon's cloud too. Vultr has machines with 1GB ram down to around $5, so I've been using them.
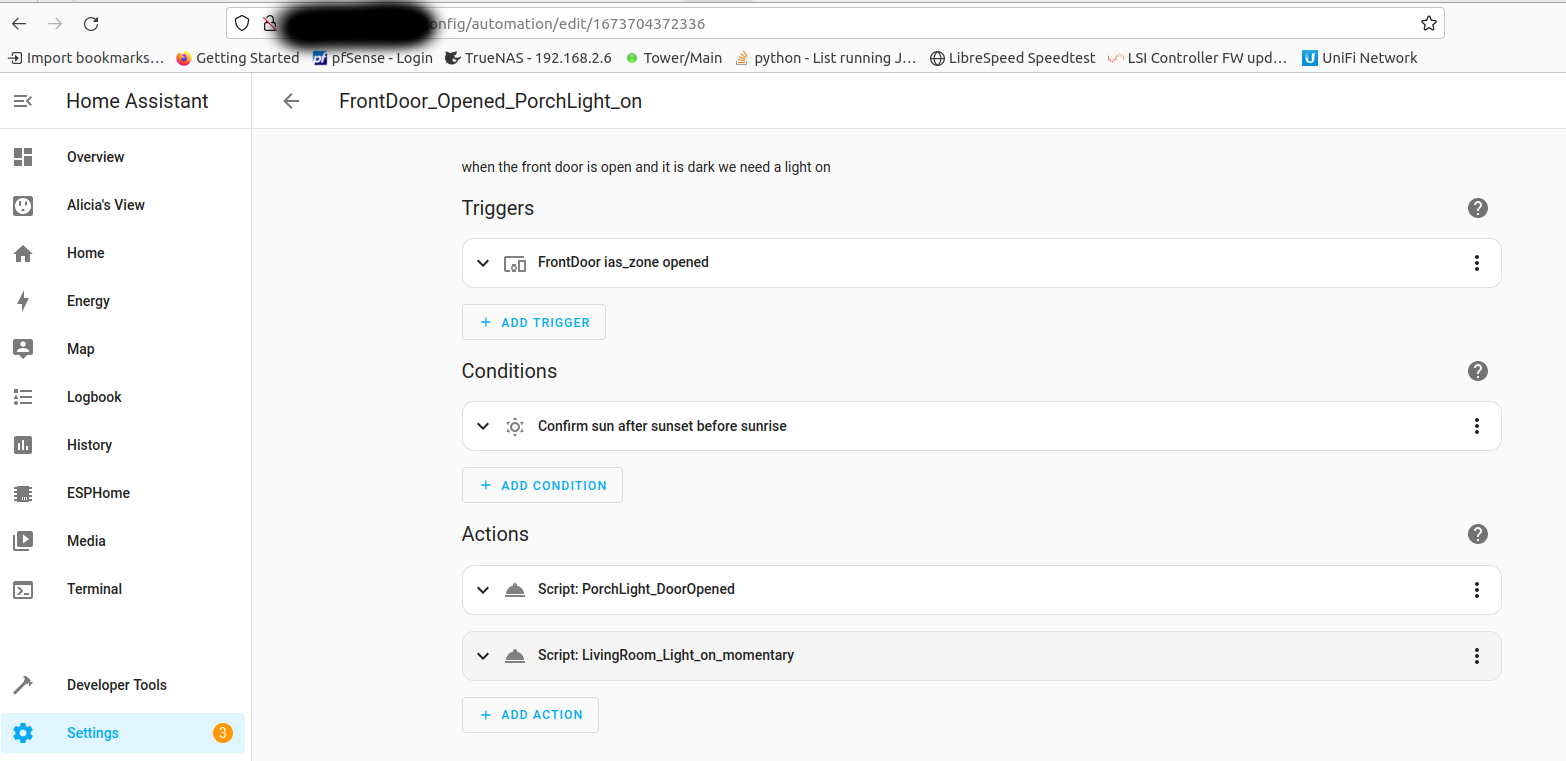
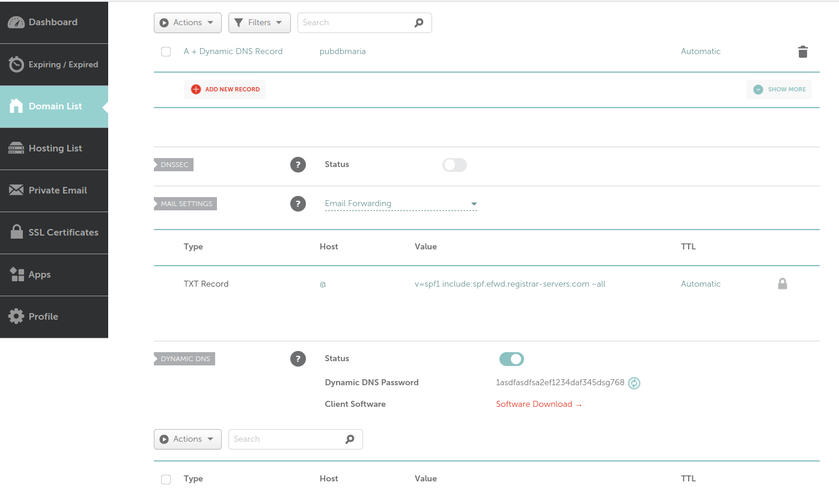
 What we can see in this image is that I own the xyz123.net on my account. That's the domain I own. I can add subdomains by clicking on "Manage" then click on "Advanced DNS". When the page loads click on "Add new Record" you want to make sure you pick "A+ Dunamic DNS Record" then for host you'd put the subdomain you want like "wireguard". When you try to access it, you would go to "wireguard.xyz123.net"... btw we aren't done on this page yet. We have to make sure we enable dynamic DNS clients...
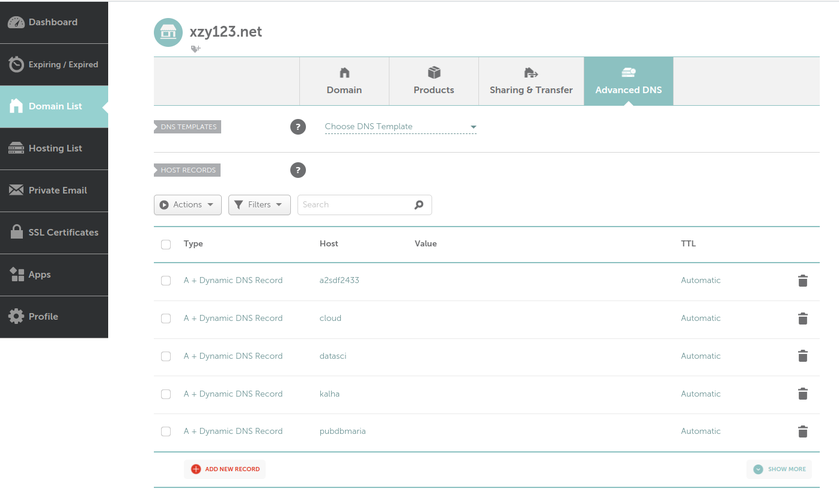
 As of today, there are some issues with this syncing. First one is that if a user A shared their files with another user B, that user B will immediately start downloading the files whether they want them or not. There is a feature you can enable to prevent automatically downloading if the filesize is too large. This helps mitigate issues but not completely. If someone really wanted to mess with others they could create shares up to that limit and simply spam the targeted user forcing them to download a ton of files just under that limit... I think the fix to this is to default to always asking the user if they want to accept a share and what to do with it, or even simply accept it but don't auto download.